It’s just some kind of magic that beautiful eyebrows and expressive long eyelashes make with women. Instantly plus a hundred to seductiveness and self-confidence!
Eyebrow and eyelash lamination is a great way to wake up with makeup right away and look amazing without any extra effort. How to do this procedure at home, and what tools will be needed?

Benefits of Eyebrow and Eyelash Lamination
Although the undisputed voice “For” the procedure for laminating eyelashes and eyebrows says that it is quite beautiful and aesthetically pleasing, it has both pluses and minuses.
Benefit:
- Visually well-groomed, neat eyebrows and eyelashes.
- Looks natural and natural, a beautiful curl of eyelashes.
- After the termination of the effect of the procedure, there is no need for urgent correction (as, for example, with extensions).
Harm:
- When laminating eyelashes, the composition of the products may get on the mucous membrane, which will cause discomfort or even allergies.
- If the first effective composition is applied incorrectly to the root or tip of the eyelashes, their fragility may increase.
- It is impossible to carry out the lamination procedure if there is a rash in the area of the eyebrows or diseases of the mucous membrane of the eyes (in particular, barley).
The effect of lamination usually depends on your natural data, on average it lasts 3-4 weeks.
Step-by-Step Guide to Eyebrow and Eyelash Lamination
Before proceeding to the stages of lamination of eyelashes and eyebrows, consider a few important rules that you need to remember in order to get a good result:
- Keep it symmetrical and mirrored.
- If there are problems with vision (for example, astigmatism), then it is better for you not to perform the procedure.
- It is better to do lamination yourself on your own after you gain experience with someone and your hand is trained.
- Assess the density and texture of eyelashes and eyebrows.
- Study in advance how long you need to keep the product of the selected manufacturer, taking into account both general recommendations and the characteristics of your eyelashes.
- If you do the procedure to yourself, then lay more time than the master. For at the same time, only experienced conjurers can work out both eyes.
- Prepare the workplace, everything you need should be at hand. Do not go to a fortuneteller, it is 100% inconvenient to look for funds when you are like a cyclops, with one eye, while the composition is applied on the other.
Laminating kit at home
To complete the procedure, you will need:
- Active compounds (A, B, C);
- Eyelash degreaser;
- Microbrooches;
- Glue;
- Curlers ;
- Paint and oxidizer;
- Eyelash separation tool ;
- Brush with artificial bristles for applying paint and compositions.
Stages of lamination of eyelashes and eyebrows
To be honest, it is still more convenient to carry out the procedure for laminating eyelashes at home, not for yourself, but for your girlfriend. It makes sense to learn how to do it together and from time to time arrange a beauty party. But if you are confident in your dexterity, then we have compiled detailed instructions for you.

Degrease eyelashes and prepare the shape.
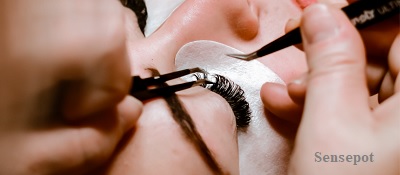
Apply a degreaser to the micro brush. Run it over the top of your lashes, then comb and dry. Coat the inside of the curler with glue. Fix along the last lash line on the upper eyelid. It is important that all eyelashes are on top of the curler, and do not fall under it.
Fix eyelashes on curlers.
Start at the outer corner of your eye. Apply glue to the curlers, and fix a small amount of eyelashes on them. Strip them quickly. It is important to do it in small parts in order to have time to properly separate the eyelashes and carefully lay them on the curlers. Separate the lashes from root to tip so that they lie vertically, do not overlap, and are well-taut. When you finish laying out the form, it’s time to move on to the compositions.
Apply compound A.
Composition A breaks disulfide bonds. The goal is to soften the eyelashes and make them more supple.
The composition should be applied with an indent of 1-2 mm from the mucosa. Make sure nothing gets on her. If, when applying the composition, the eyelashes move away from the form, then they can be fixed with cling film. The eye must be kept closed.
After keeping the composition for the right time, remove it from the eyelash area with a dry cotton swab. If some of them have peeled off, using the tool, the eyelashes can be returned to the adhesive area.
Apply compound B to fix the shape.
Keep composition B about half the size of the first. While you wait, pre-dilute the paint with an oxidizing agent in a ratio of 1: 1. After the required exposure time, clean the eyelash area with a dry stick.
Visit: How to Remove Puffiness From The Face 7 Tips
Color your eyelashes.
Next, paint over the eyelashes from root to tip. Usually, even for those who have long eyelashes, the tip is more transparent and less noticeable. Thanks to the staining, it is clearly defined, and the eyelashes begin to appear longer. After maintaining the required time, clean the eyelashes with a dry or wet stick.
Apply compound C, and remove paint and glue.
Apply composition C to the entire length of the lashes. With a baby brush, comb your lashes, soften the glue, and brush it off.
Remove the curlers and clean the skin of the glue.
After you have completely cleaned the eyelashes of glue and paint, remove the curlers. To do this, pick them up with a damp cotton swab. Next, clean the eyelid from the glue and comb the eyelashes.
Repeat the procedure on the other eye.
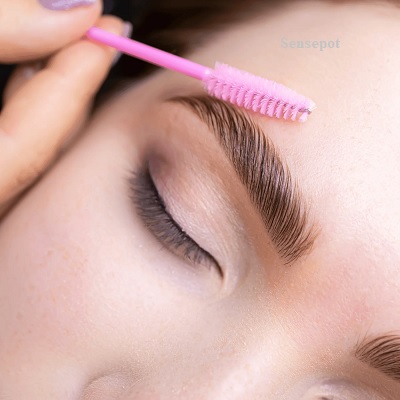
Eyebrow lamination steps are similar to eyelashes. How to make the shape of the eyebrows,
Mistakes when laminating eyelashes
Sometimes the result is not what you expected. There are two common groups of errors:
- Choice of curlers;
- Procedure steps.
Mistakes in choosing curlers:
- Wrong shape of the curler: too big or too small. Eyelashes should occupy about 70-90% of the roller, cross the peak of the form, and go beyond it by 20-30%.
- Incorrect installation of the curler roller. It should start from the inner corner of the eye, not rest against the bridge of the nose, and, moreover, not go on it.
- The roller is too large compared to the eye: it should not extend beyond the eyelid or rest against the superciliary arch. It is better to cut if there is no way to find the right one.
- Different distances in different parts of the eyelid from the roller to the eyelashes.
Errors during the procedure:
- Poorly removed makeup before the procedure and forgot to degrease the hairs.
- Eyelashes from the outer corner got under the curlers.
- The base of the curler should not step on the roots of the eyelashes.
- Eyelashes poorly separated, crossed.
- The inner and outer edge of the cilia is not worked out. Check that the eyelashes are on the roller from the root, in tension. There should be no loops or gaps under the eyelashes.
- Too much glue can prevent the compounds from penetrating into the lashes.
- Incorrect application of formulations. It is necessary to lay out from the outer corner to the inner (go from more to less dense eyelashes). If you spread it high from the roots, you may also not get a beautiful shape of the bend of the eyelashes.
- Don’t leave the glue or paint in the last step, so you don’t get an allergic reaction.
- Incorrectly selected time of action of the compositions. Especially the first, destroying disulfide bonds. Underexposed – there is no effect of a beautiful bend of eyelashes. Overexposed – twisted eyelashes.
Aftercare for Eyebrow and Eyelash Lamination
In order for the effect of the procedure to last longer, and the hairs to be well-groomed and protected, after the procedure, you should follow a few simple tips:
- During the day after the procedure, it is advisable not to wet eyelashes and eyebrows, to avoid actively rubbing them.
- Be sure to comb your eyebrows and eyelashes regularly with a special brush.
- Application of care products. Since the procedure affects the structure of the hairs, they need to be helped to recover naturally. To do this, do not forget to apply a special oil every evening.
Lamination of eyelashes and eyebrows allows you to be like the heroine of melodrama: just woke up, and already with makeup. The look and facial features become expressive and emphasized. But remember that this is still a chemical effect on natural eyelashes, so you should take breaks between procedures so that eyelashes and eyebrows are restored, and the procedure brings only benefits and beauty.
FAQs
1. Is it safe to do eyebrow and eyelash lamination?
Yes, when done correctly and with the right products, eyebrow, and eyelash lamination are generally safe. It’s important to follow the instructions carefully and do a patch test before using any new products to make sure you don’t have an allergic reaction.
2. How long does eyebrow and eyelash lamination last?
Eyebrow and eyelash lamination can last for about six to eight weeks. However, everyone’s hair grows differently, so the duration may vary. It’s good to keep in mind that regular touch-ups might be needed to maintain the desired look.
3. Can I wear makeup after eyebrow and eyelash lamination?
Yes, you can wear makeup after eyebrow and eyelash lamination. Just wait for about 24 hours after the treatment to allow the products to be set properly. When applying makeup, be gentle and avoid rubbing or pulling on your eyebrows and eyelashes.
4. Can I do eyebrow and eyelash lamination if I have sensitive skin?
If you have sensitive skin, it’s a good idea to talk to a dermatologist or a beauty professional before trying eyebrow and eyelash lamination. They can help assess your skin’s condition and suggest suitable products or alternative treatments that are less likely to cause irritation.
5. Can I remove the lamination at home if I’m not happy with the results?
It’s usually not recommended to remove the lamination at home, especially if you’re not satisfied with the results. Trying to remove the products by yourself can potentially harm your natural eyebrows and eyelashes. It’s best to reach out to a professional who can provide the right solutions and help you achieve the desired outcome.


